If you use a sled-deck-type transportation platform or a snowmobile loading ramp, this article could be very useful. In this guide, I’ll show you in detail how to build your own traction ladder at a low cost. But first, let me explain what a traction ladder is and why you need one.
Why Use a Traction Ladder With Your Loading Ramp?
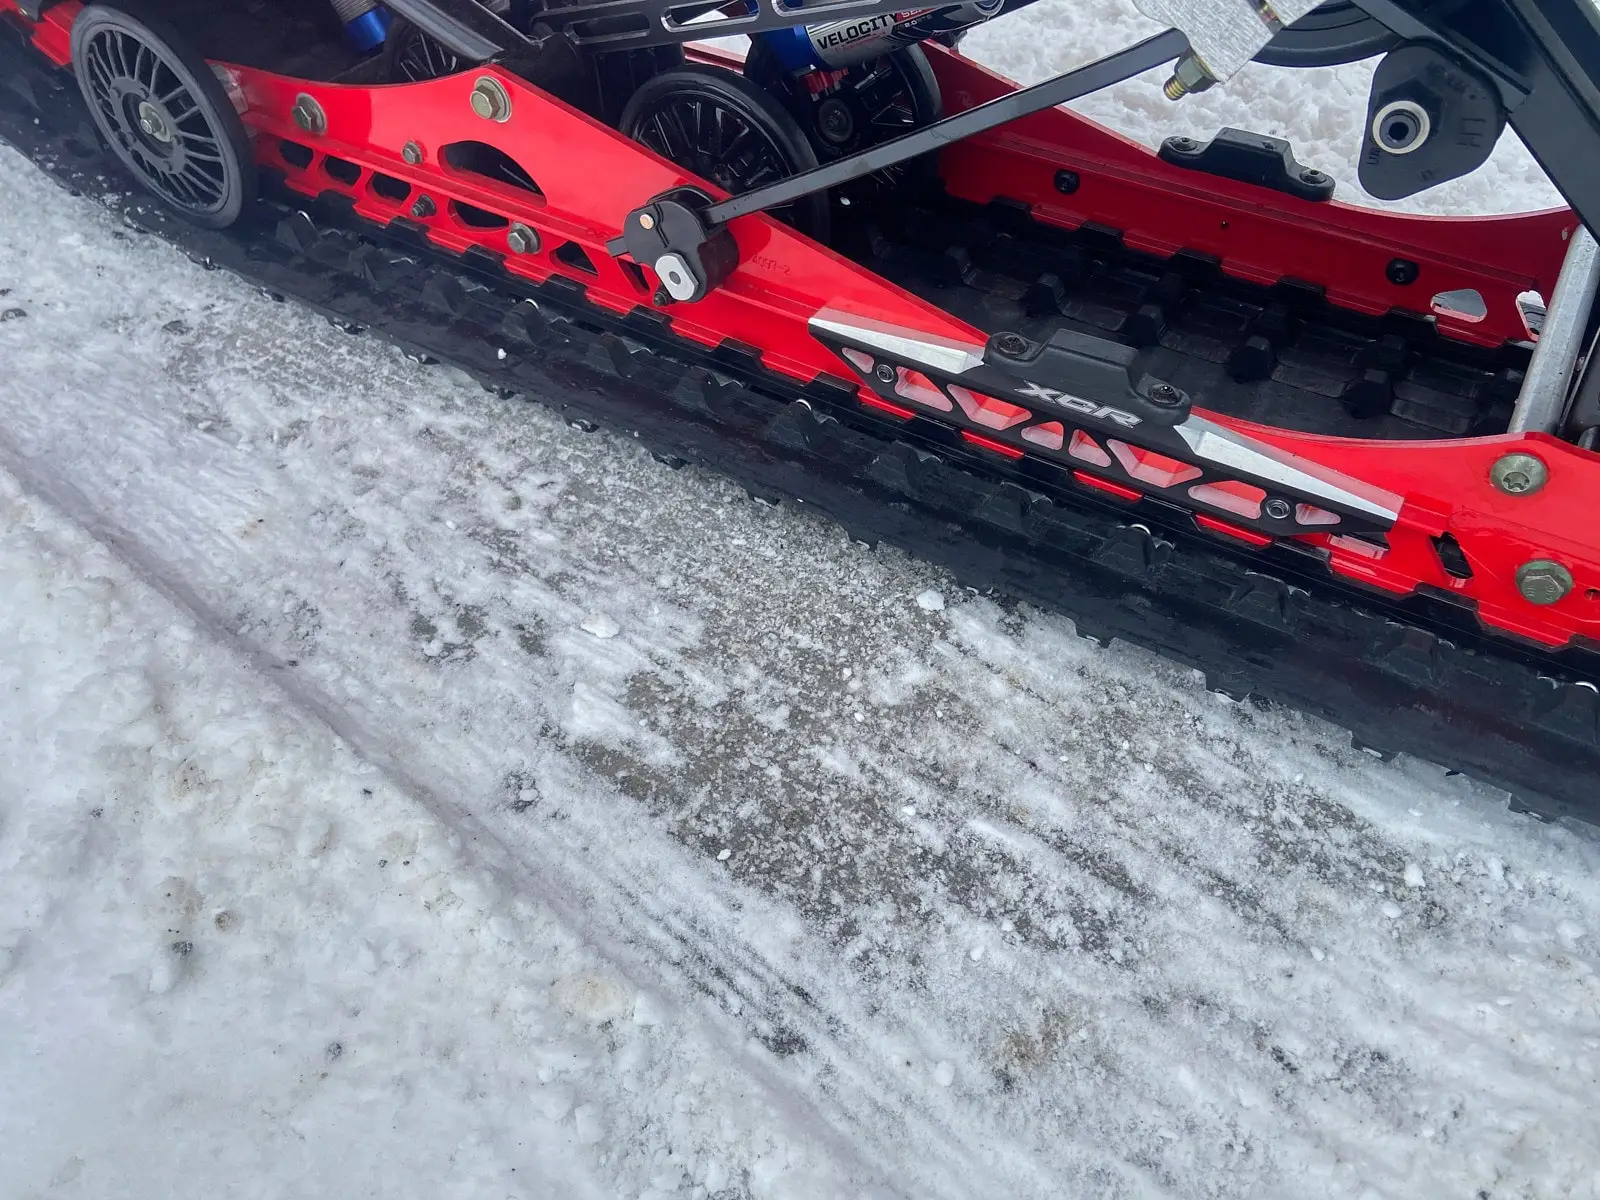
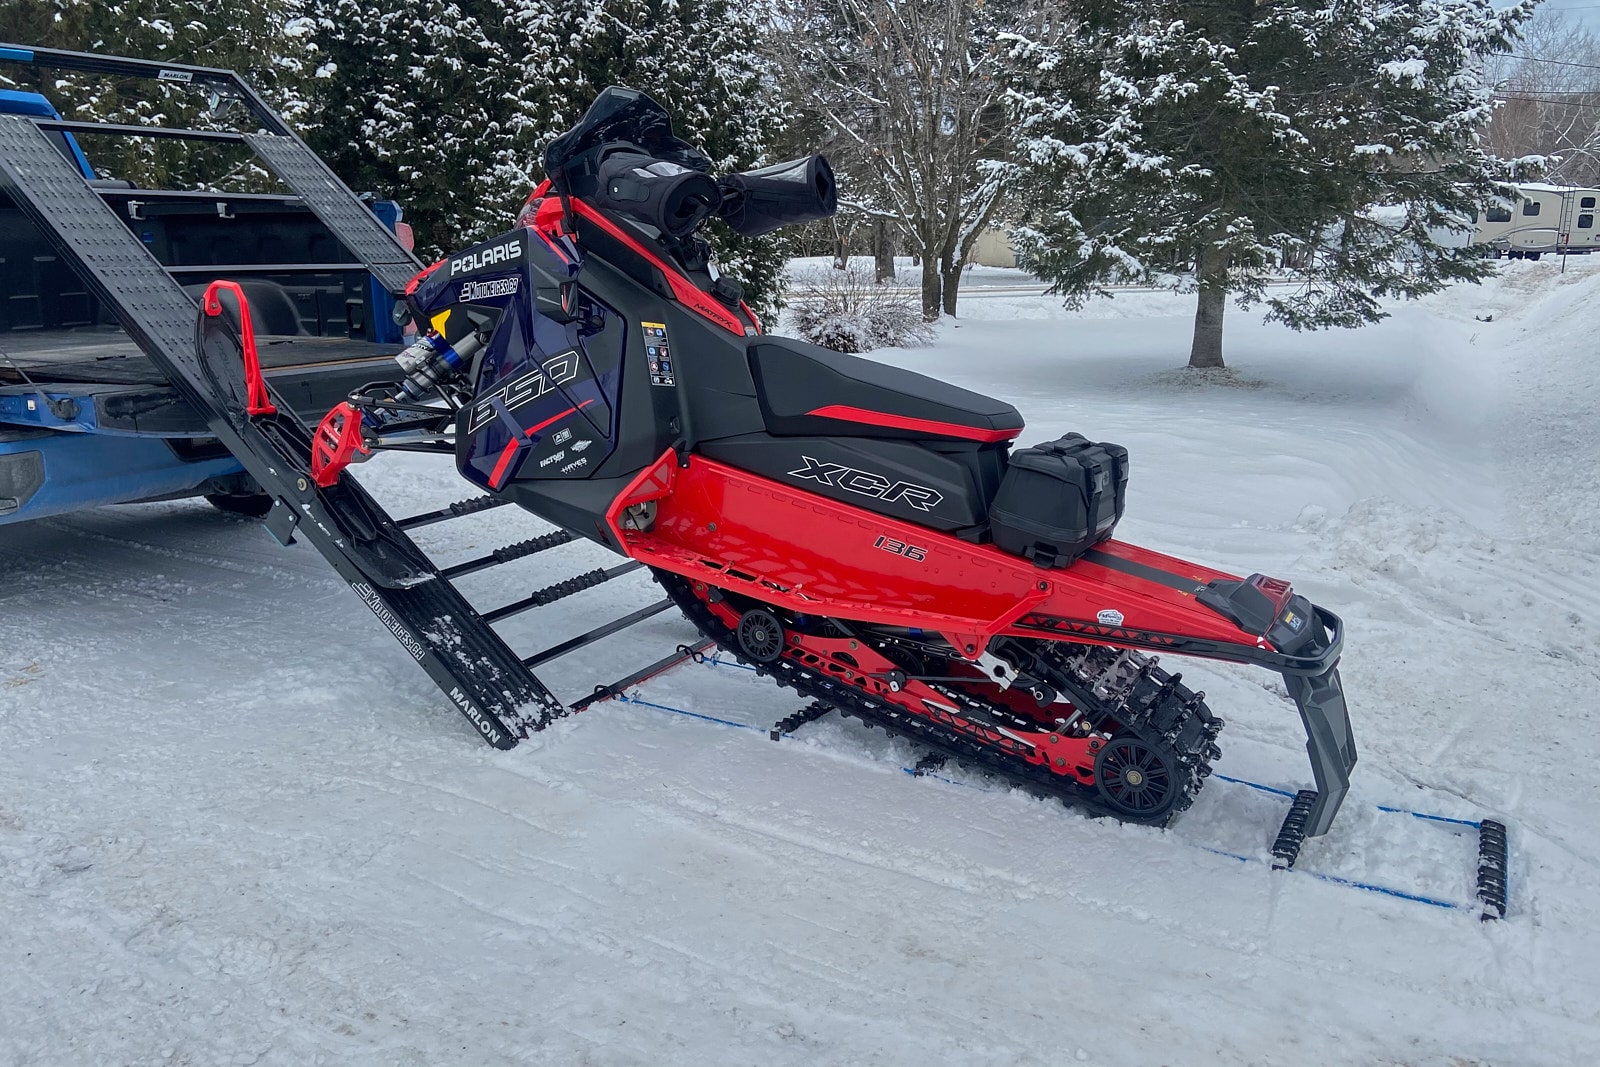
Personally, I often find myself lacking traction when using a loading ramp with my snowmobile. This lack of grip is usually caused by an icy surface. If the track loses its grip on the ground, the climb can become dangerous, if not impossible.
Some people will tell you that you don’t need a traction ladder on the ground. But if you ask me, I’ll answer without hesitation that it’s necessary. Why? Because a traction ladder reduces any risk of slipping when climbing a loading ramp with your snowmobile. I don’t know about you, but that’s reason enough for me.
Limited Options on the Market
I did a lot of research to find a ready-made product to help with my climbs. Unfortunately, I came up empty-handed. The accessories were either too short, too bulky, or too expensive. So, I decided to roll up my sleeves and build my own traction ladder that would perfectly suit my needs. I’ll now explain how you can do the same for your loading ramp.
Materials and Tools to Build a Traction Ladder
Before building your traction ladder, make sure you have everything you need. You might need to make some purchases to gather the necessary materials and tools. To help you, check out my list of materials and the tools I needed.
Materials
First, let’s talk about the materials. In my research, I tried to find the best deals possible to maximize affordability. In the list, I’ve included the price I paid for each item. Keep in mind, however, that these amounts might differ slightly due to price fluctuations. Click on each item’s name for more information.
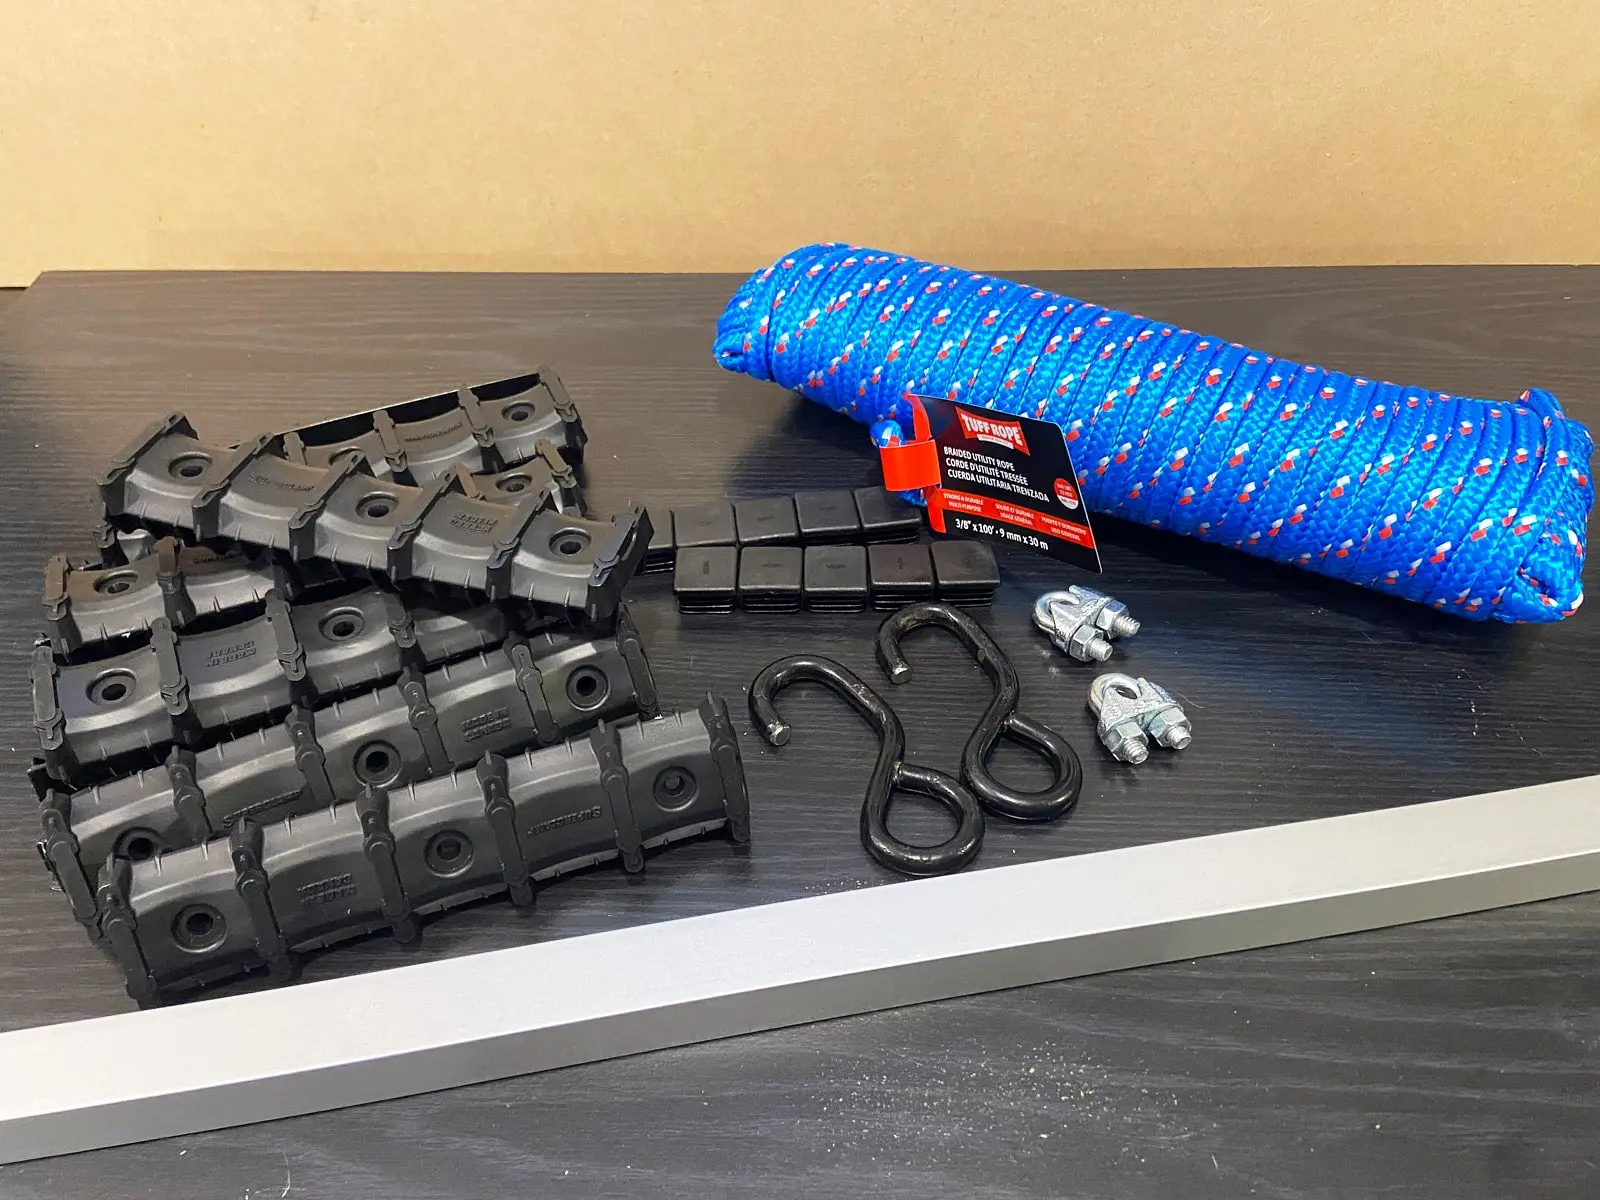
| 1 | Square Aluminum Tube (1 in. sides x 8 ft long) | $32.99 |
| 1 | 10 pk Ramp Crossbar Protector Kit | $34.99 |
| 1 | 3/8 in. Polypropylene Utility Rope (16 ft) | $14.99 |
| 2 | 1 in. PVC-Coated Tie-Down Strap S-Hooks | $2.98 |
| 1 | 2 pk 5/16 in. Wire Rope Clips | $2.29 |
| 1 | 10 pk 1 in. Square Tubing Plugs | $3.49 |
| Sous-total | 91,73 $ | |
| Taxes | $13.74 | |
| TOTAL | $105.47 |
As you can see, I got away with a total of just over $100. Personally, I think that’s quite reasonable. What do you think?
Tools
Now that you have your materials, it’s time to prepare your tools. Here’s what I used to build my traction ladder:
- Hacksaw
- Files
- Measuring tape
- Pencil
- Centre punch
- Drill
- Metal drill bits
- Socket for cable ties
- Rubber mallet (or hammer)
Tutorial: Steps to Build a Traction Ladder
You’ve gathered all your materials, and your tools are ready at hand. So, let’s get down to business. In this section, I’ll explain how to build your own traction ladder step by step. Let’s go!
Step 1: Prepare the Crossbars
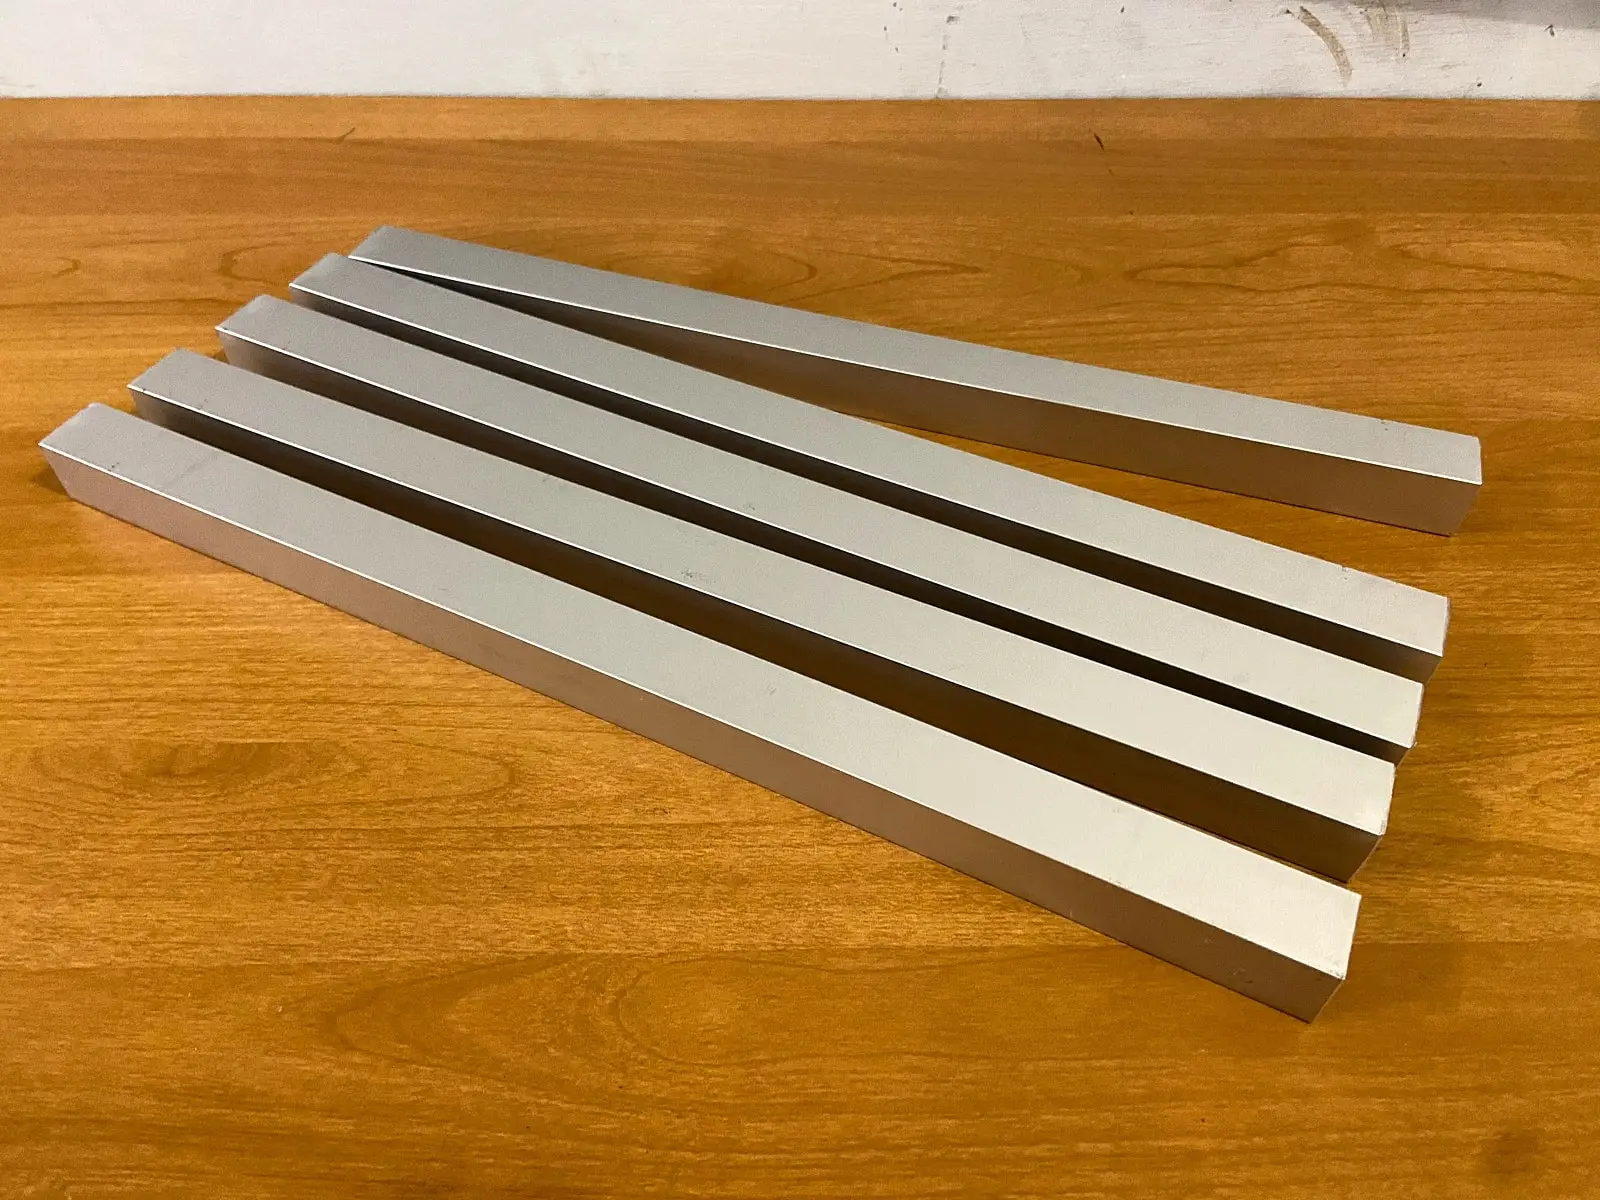
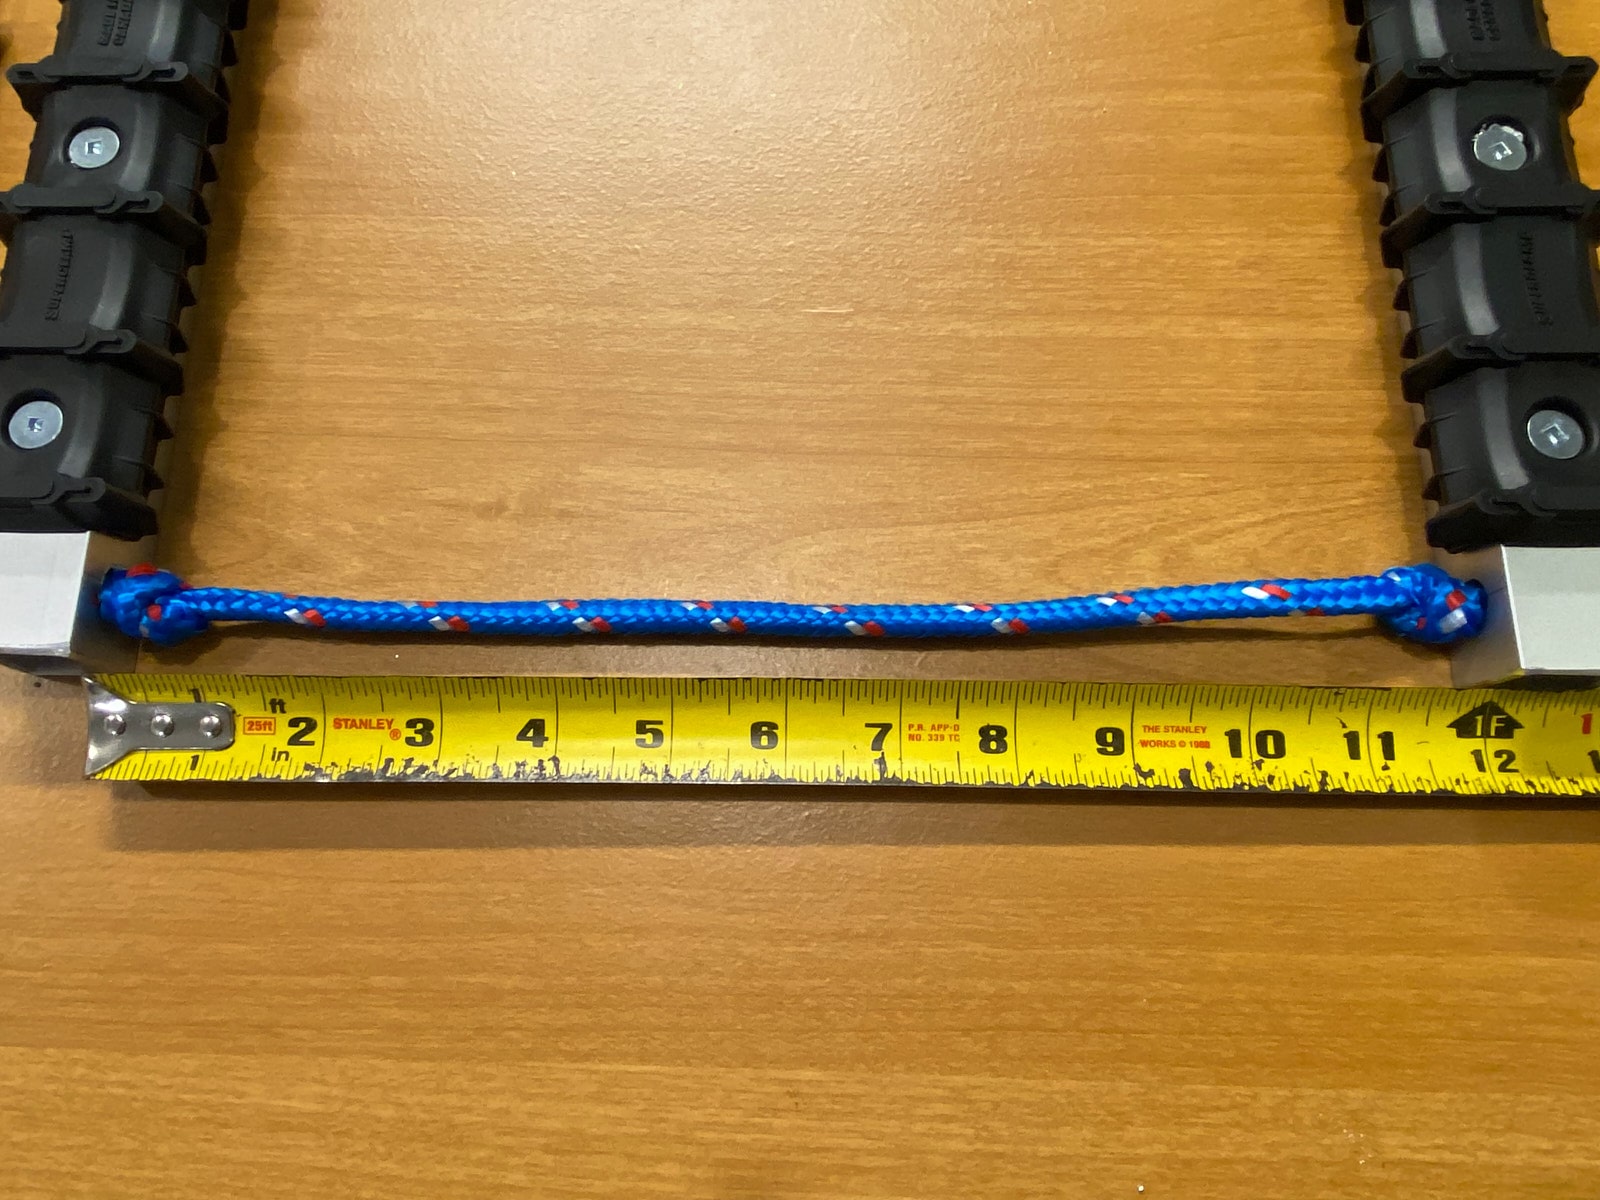
- Using a hacksaw, first cut your square aluminum tube into five (5) pieces of 17 in. each.
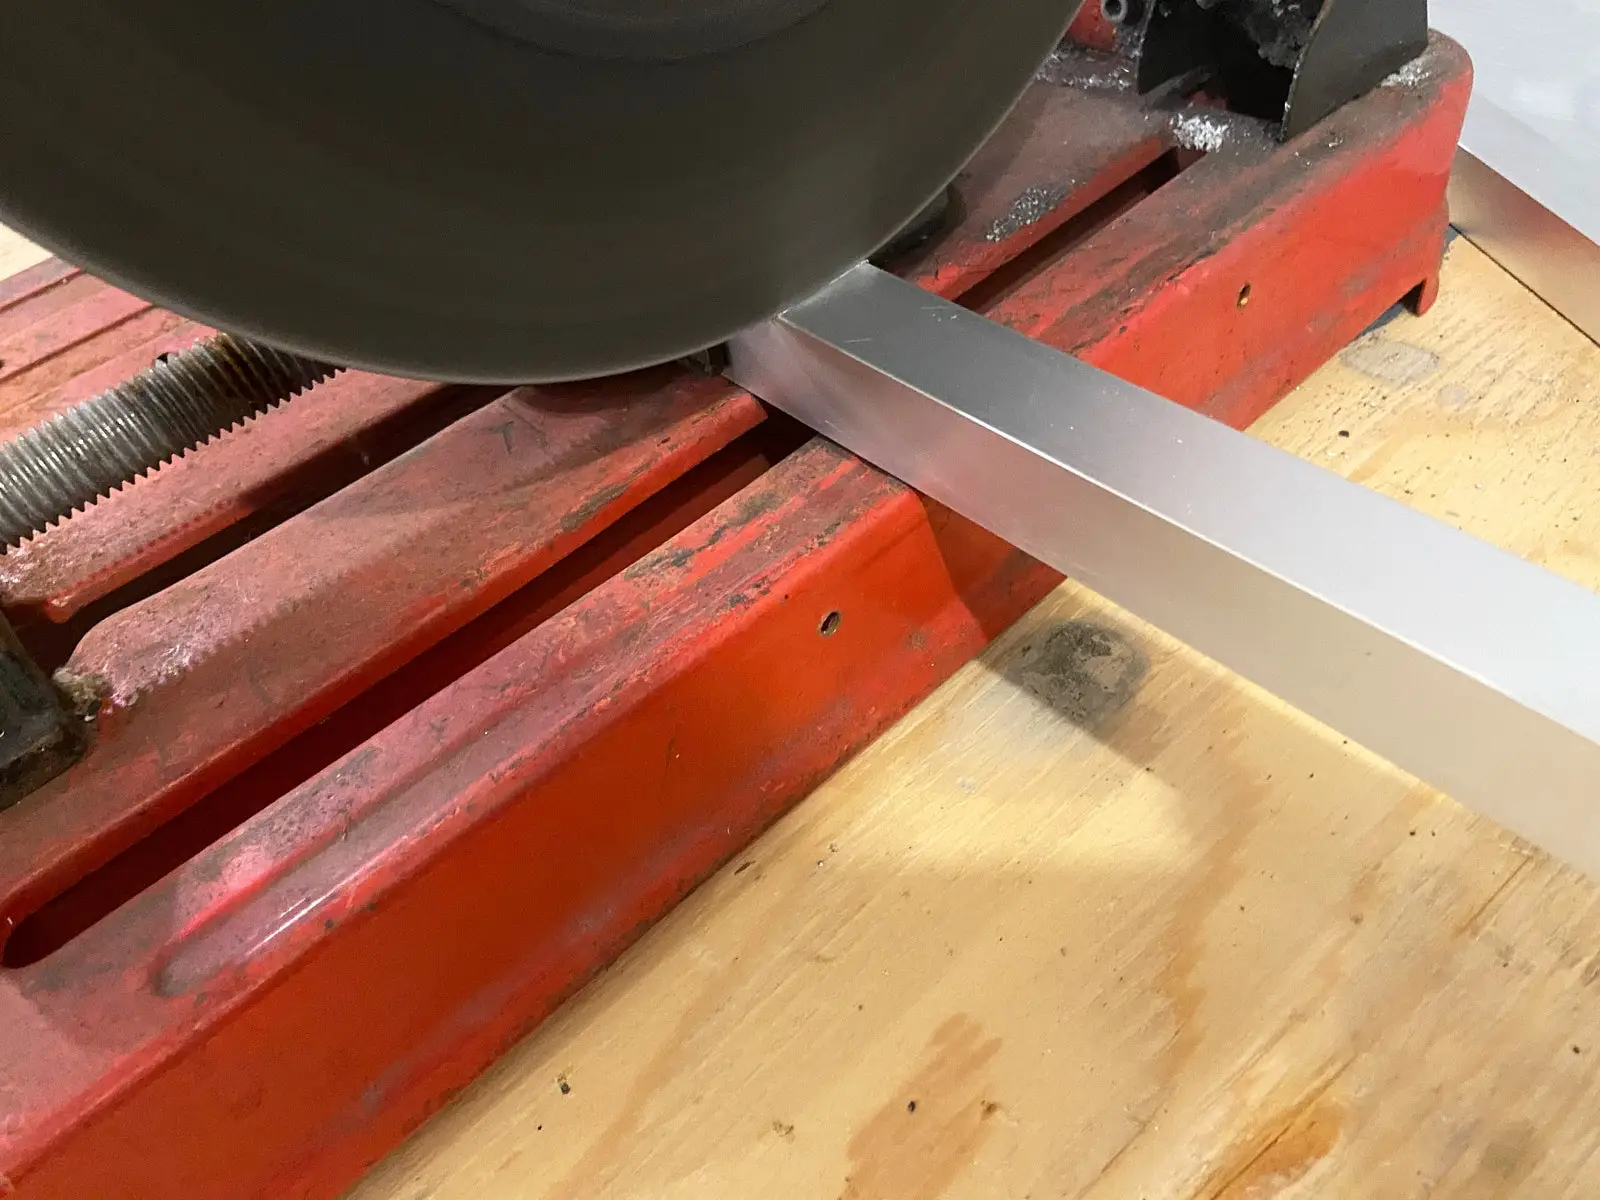
- Next, use a file to give a good finish to both ends of each tube. The care taken in this step will have a direct impact on the quality of the final result. So, be meticulous. Additionally, this will greatly help when adding the plastic end caps in the final step.
Step 2: Drilling
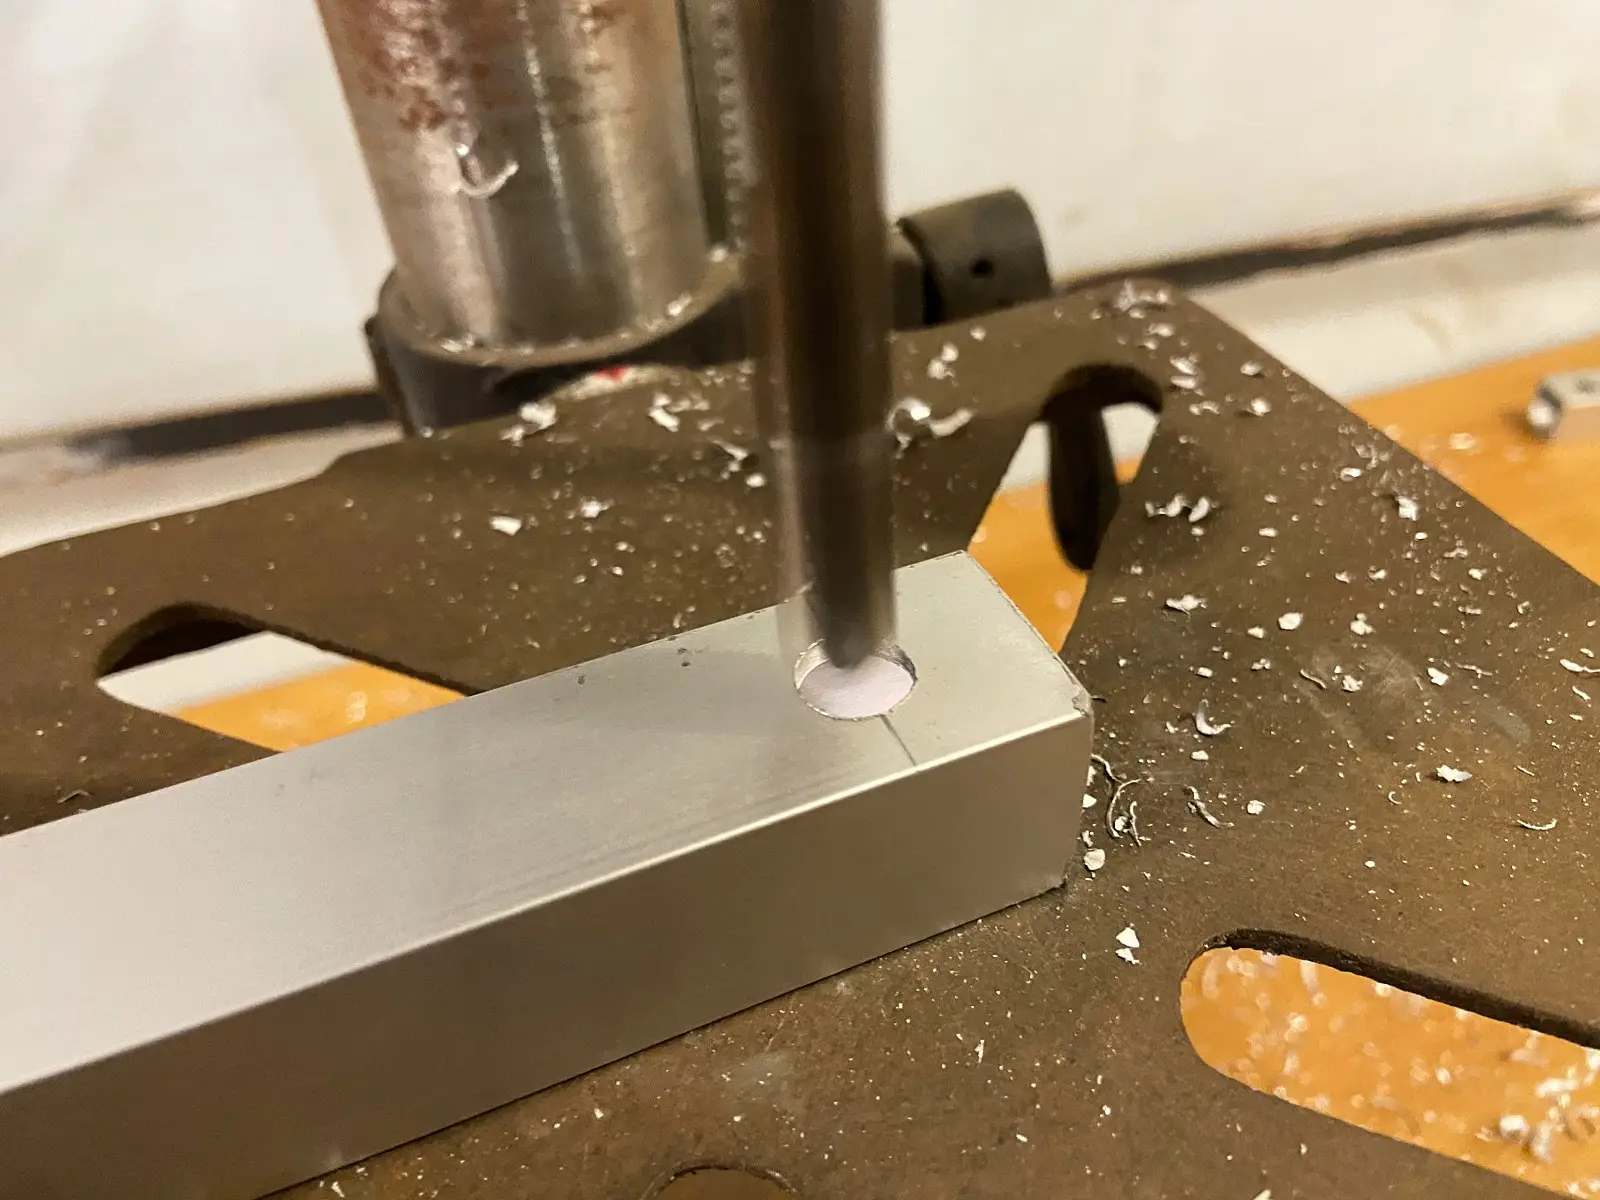
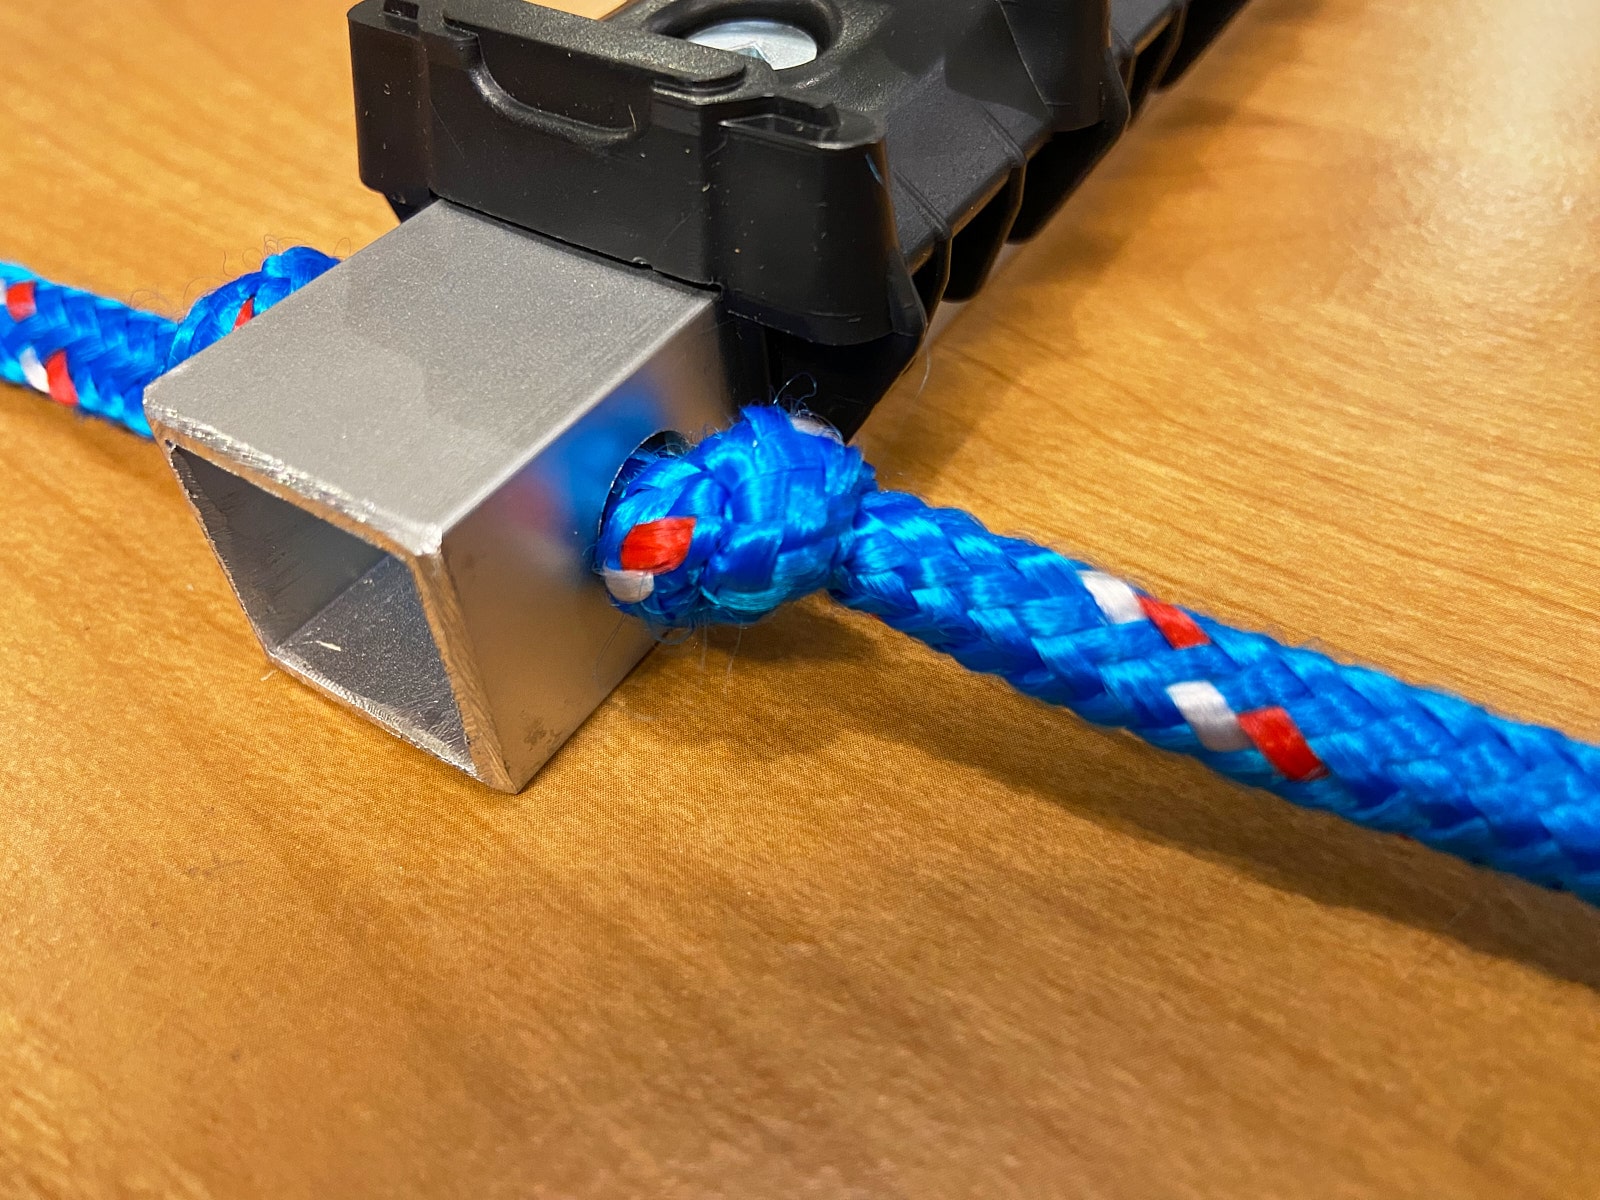
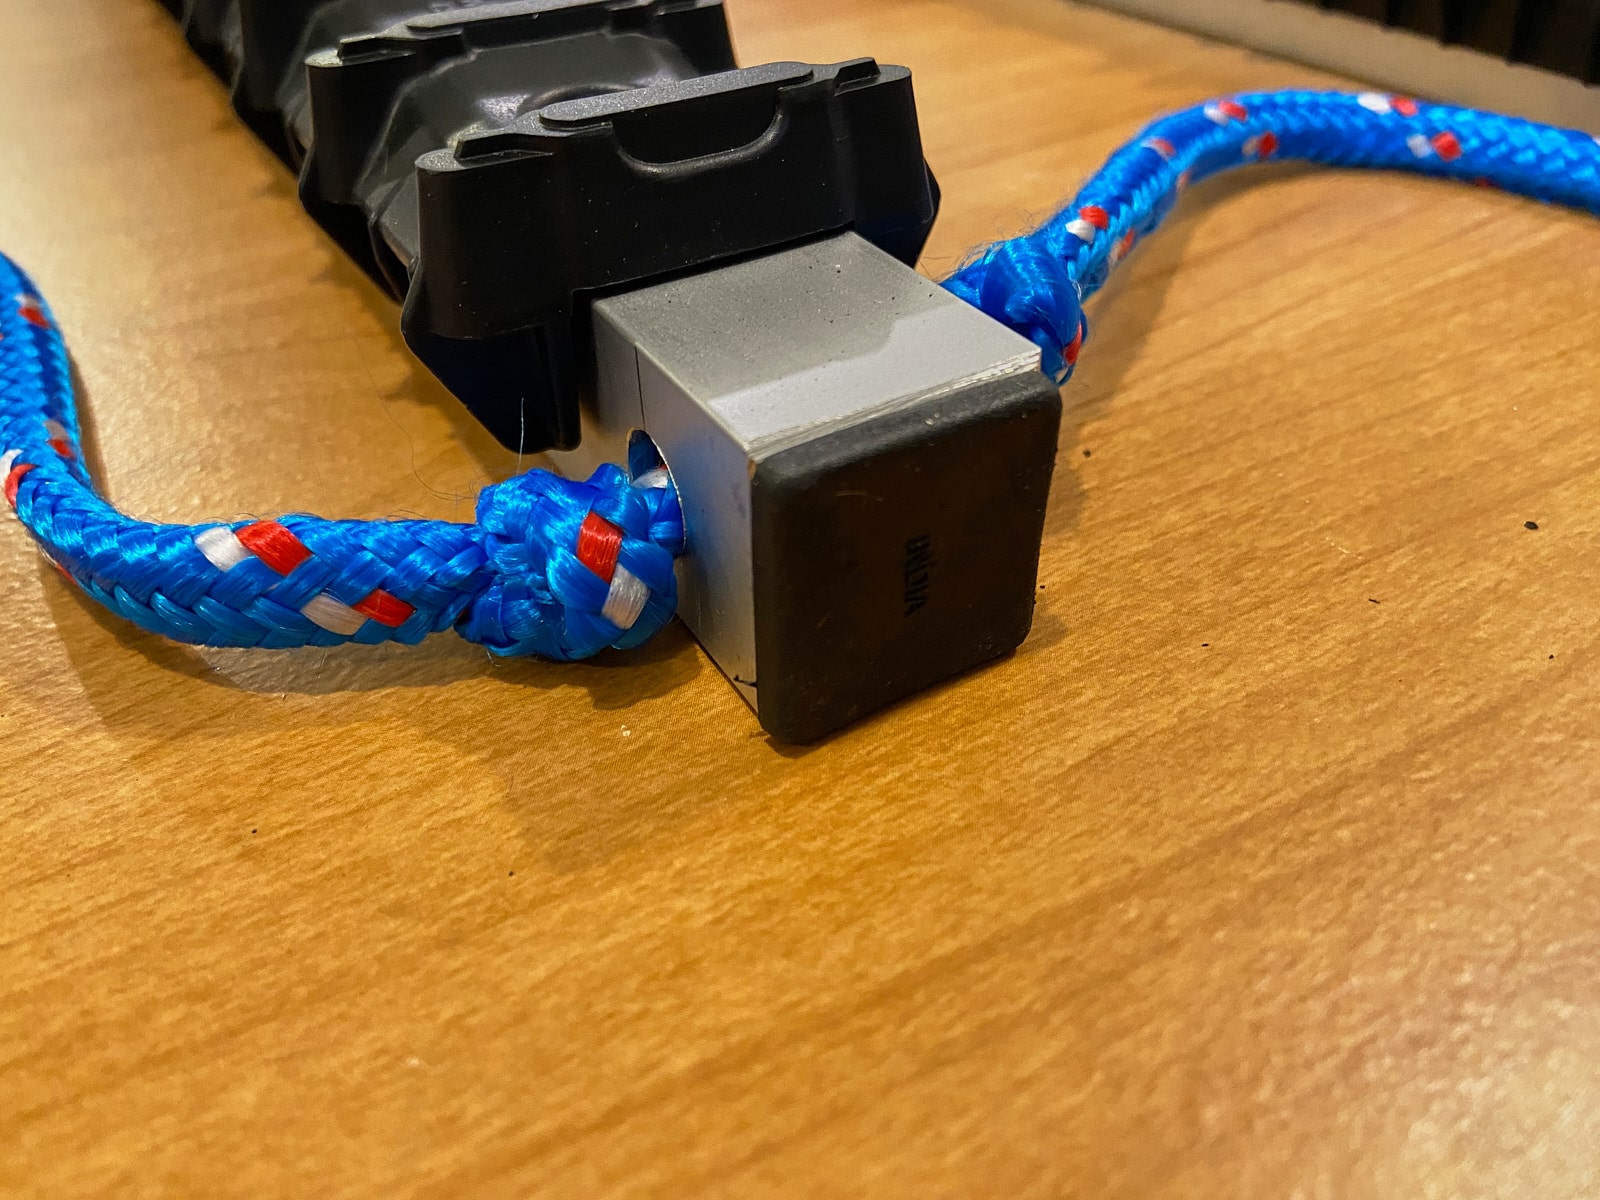
- Using a measuring tape and a pencil, make a mark ¾ in. from the edge at both ends of the five (5) aluminum tubes you just cut.
- Then, using a centre punch, make a mark at the ends of the tubes at the ¾-in. mark. This is where you’ll drill in the next step.

- Next, install a 7/32’-in. metal drill bit in your drill, then drill a pilot hole at the ends of each tube. Make sure to align properly with the marks you made in the previous step.
- After that, switch to a 3/8-in. drill bit and enlarge the holes you just made.
- Finally, use a round file to clean up the work you’ve just done.
Pro Tip
If you have access to a drill press, it will offer greater precision. Otherwise, a regular drill is perfectly sufficient for the task.
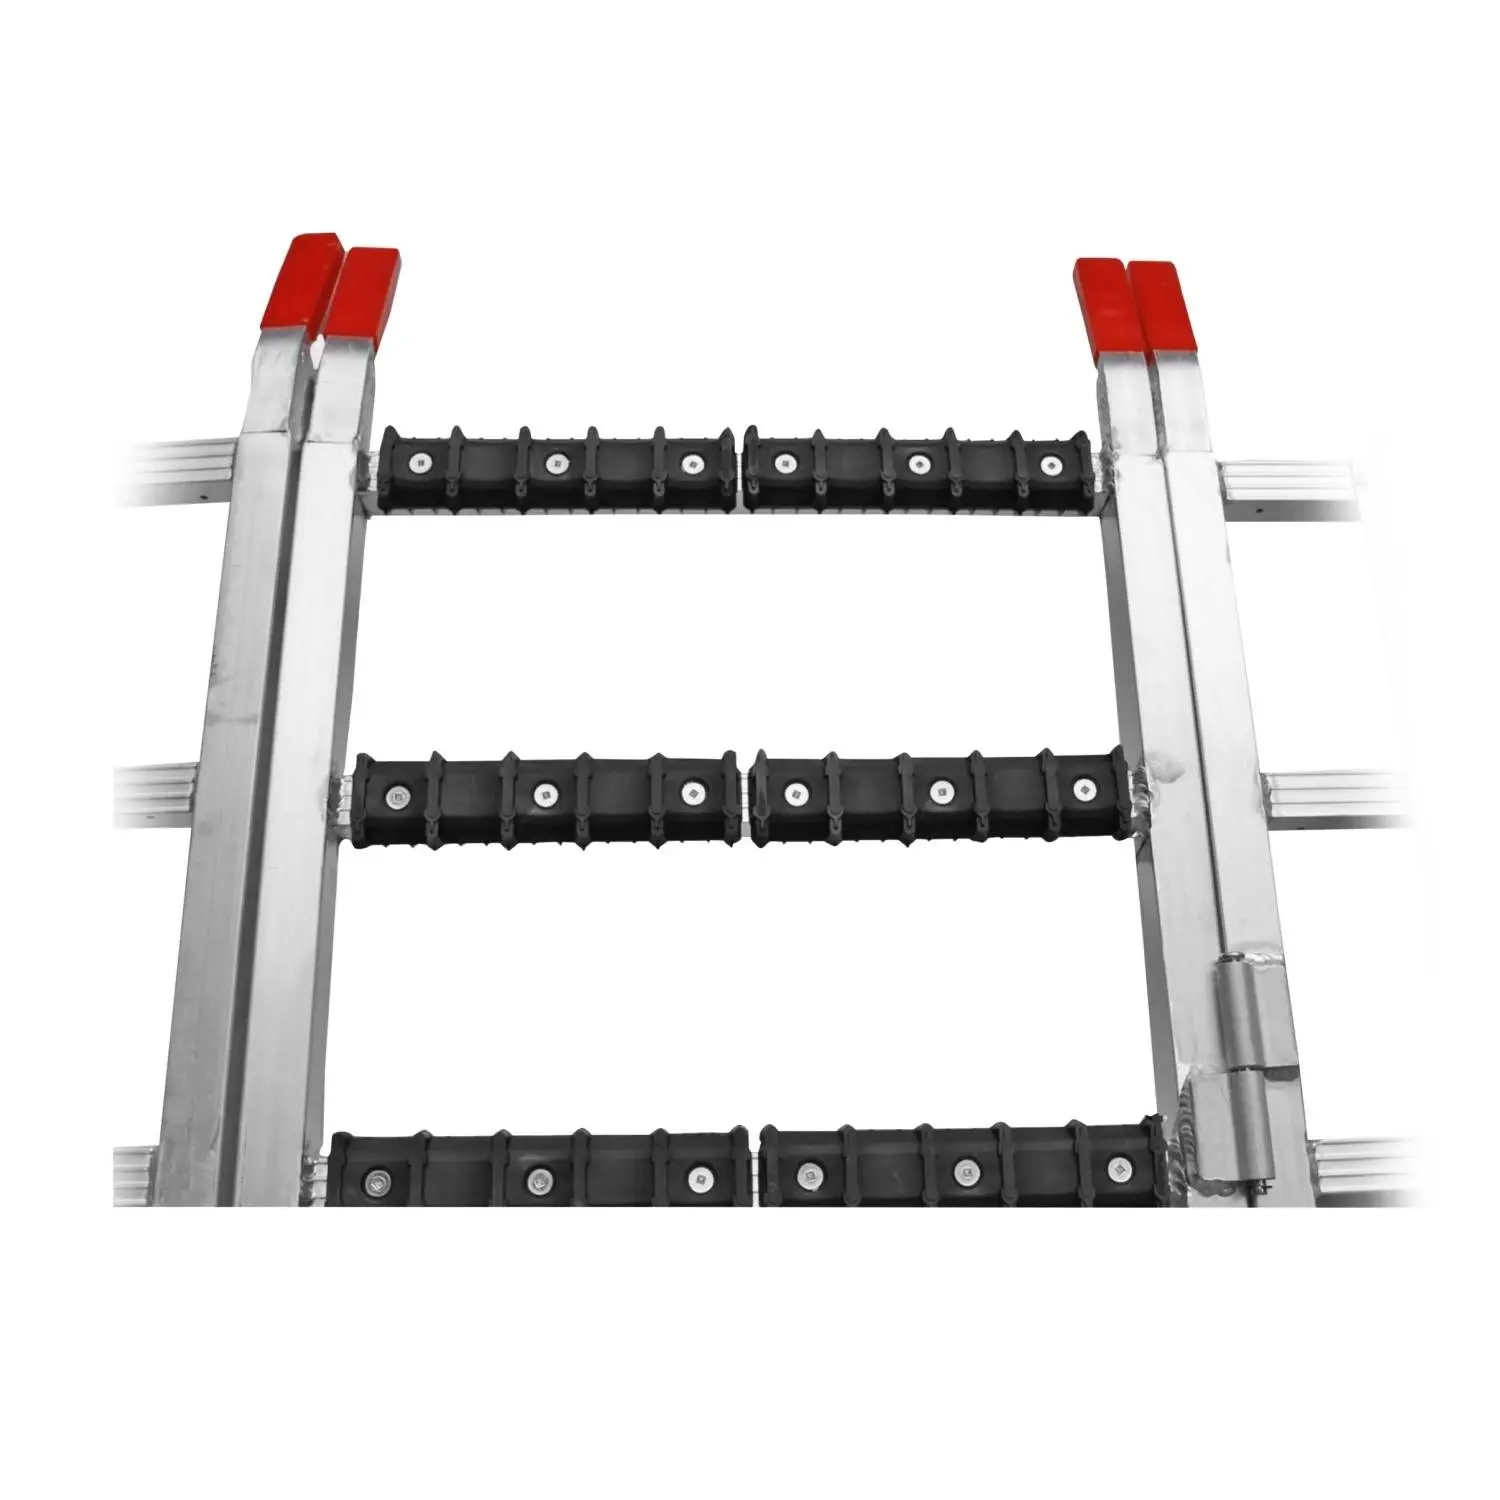
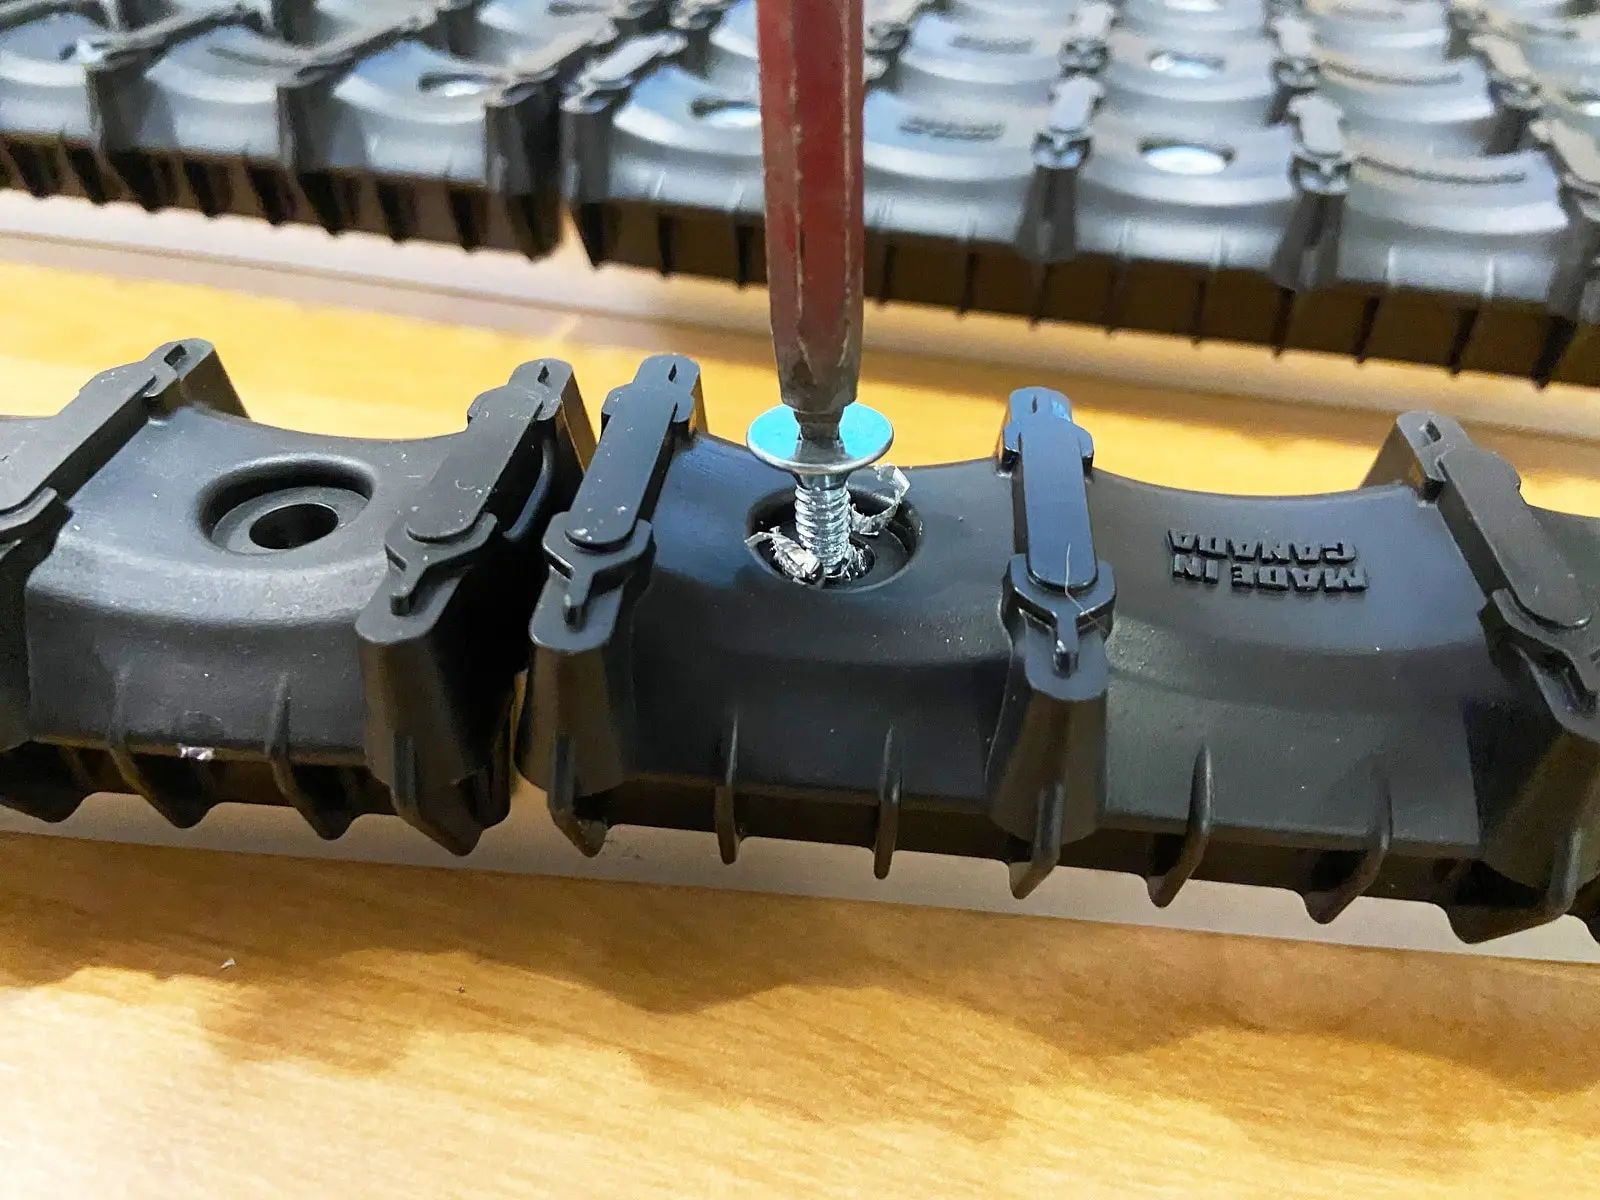
Step 3: Install the Crossbar Protectors
At this stage, we’ll install the crossbar protectors. The protection kit you purchased should include ten (10) 7.5-in. protectors and thirty (30) mounting screws.
- Take an aluminum tube and place it flat on your work surface. The holes you drilled in the previous step should be on the sides, not on top.
- Using the measuring tape and pencil, make a mark at the centre of the tube. The mark should be 8.5″ from the end.
- Then, place two (2) protectors end to end on each side of the centre. If you measured correctly, you should have exactly 1 in. of bare metal at each end. Remember, the protectors should not be on the same side as the holes you drilled earlier.
- Next, use your drill (screwdriver) to attach the protectors to the tube using the mounting screws included in the kit. Since these are self-tapping screws, you don’t need to pre-drill.
- Repeat these steps for each of your tubes.
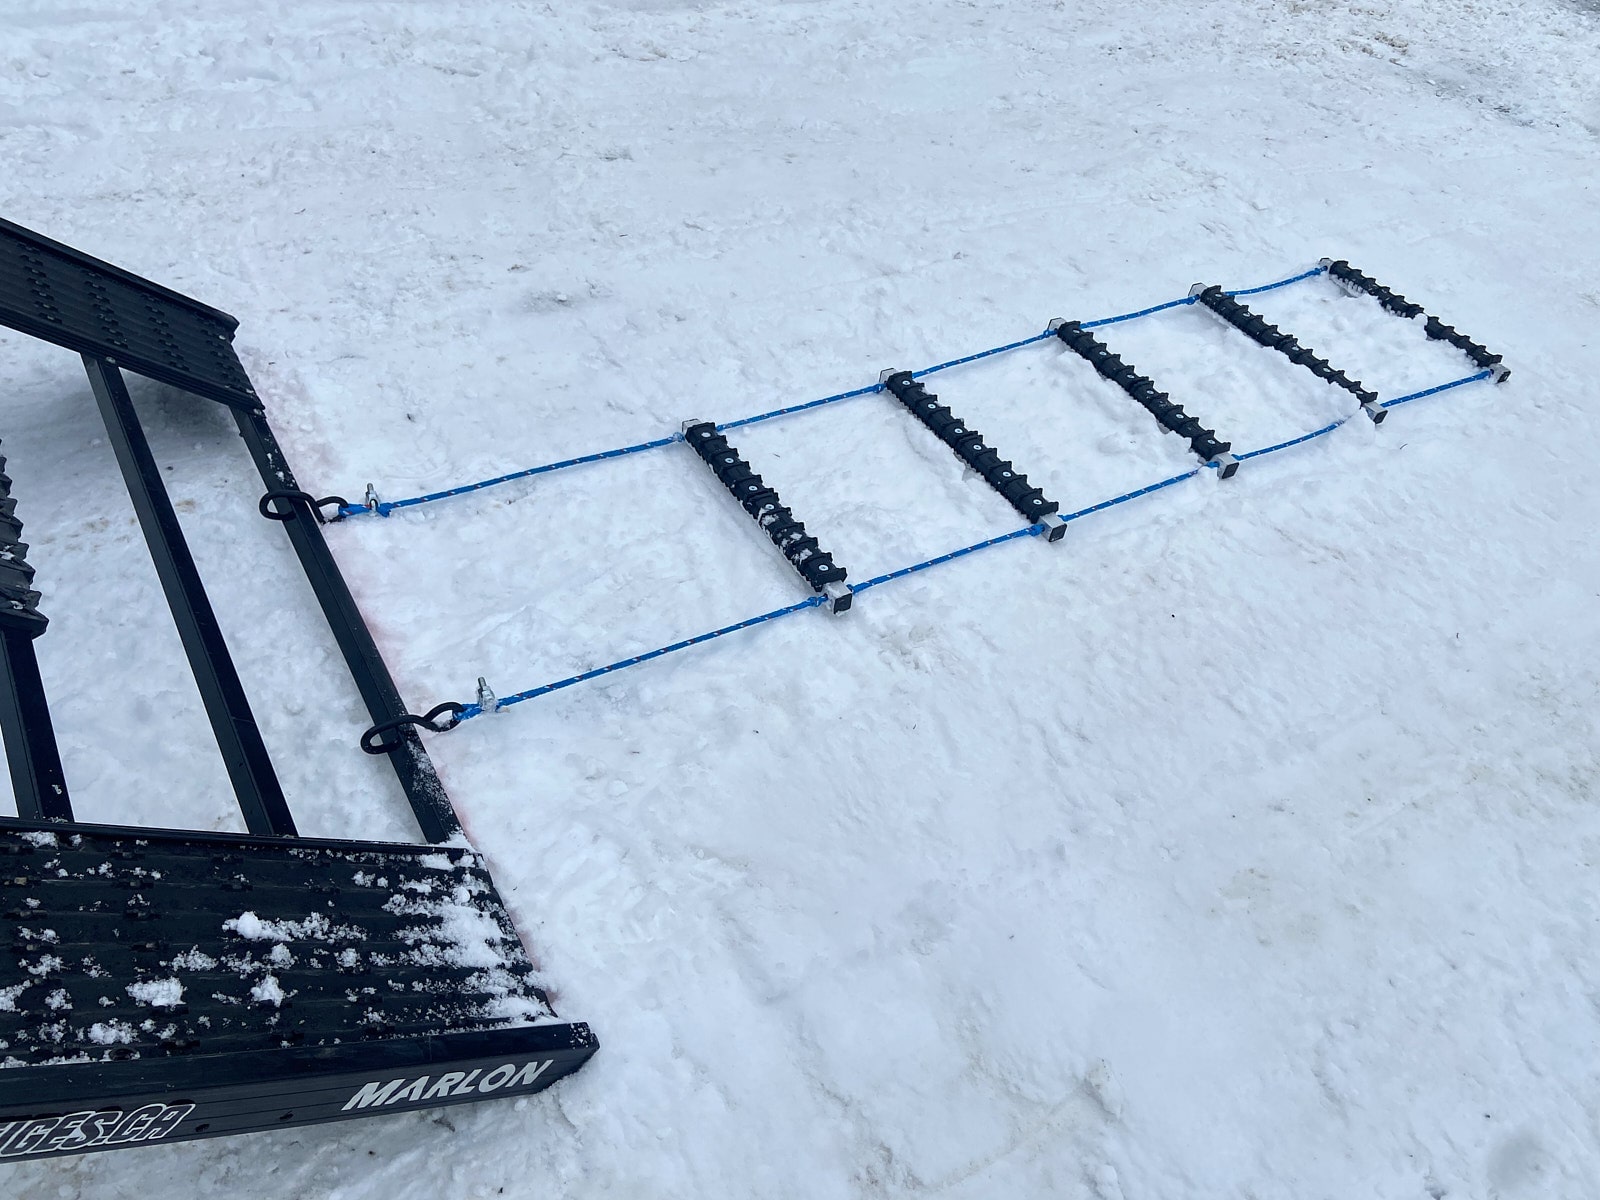
Step 4: Assemble the Crossbars into a Ladder
- Take out your utility rope and cut a piece 16 ft long. Keep in mind that it’s always better to have a little extra than to run short.
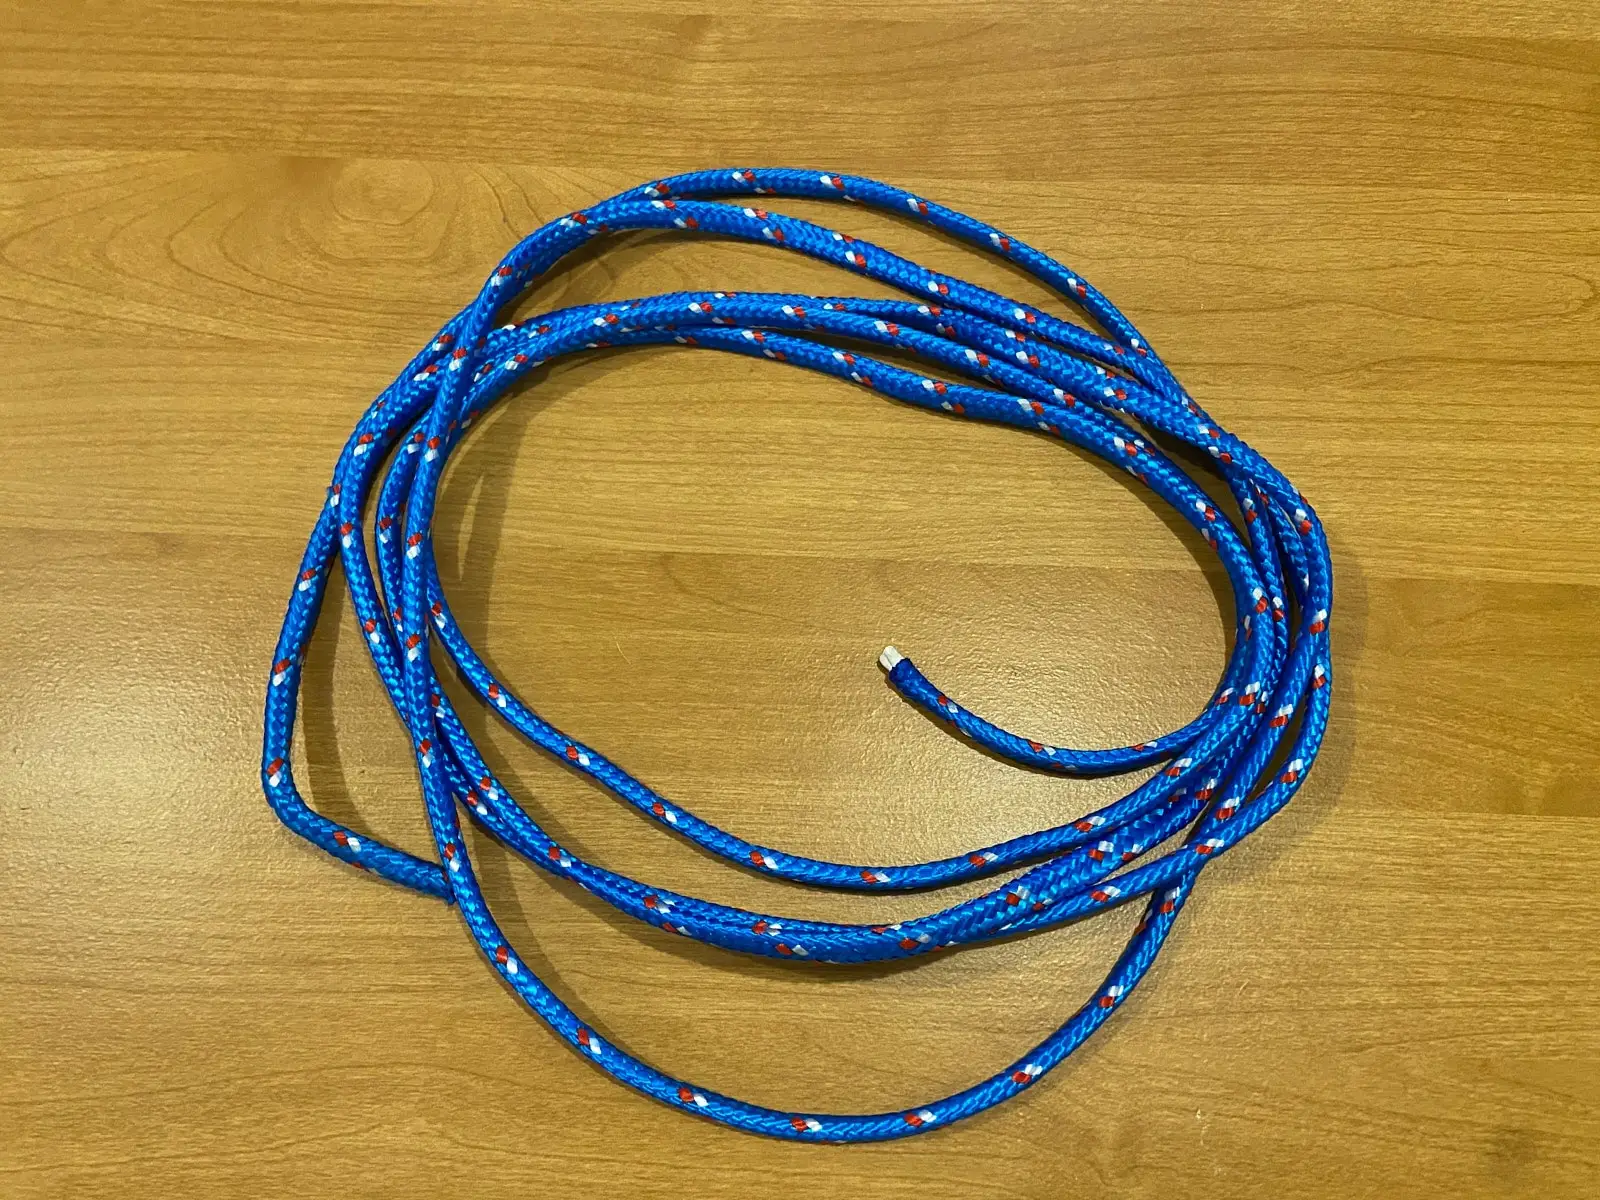
- Next, take a first tube and thread the rope through the holes at each end as if you were lacing a boot.
- Position the tube so that the rope is the same length on each side. You should have at least 87 in. of rope remaining at each end.
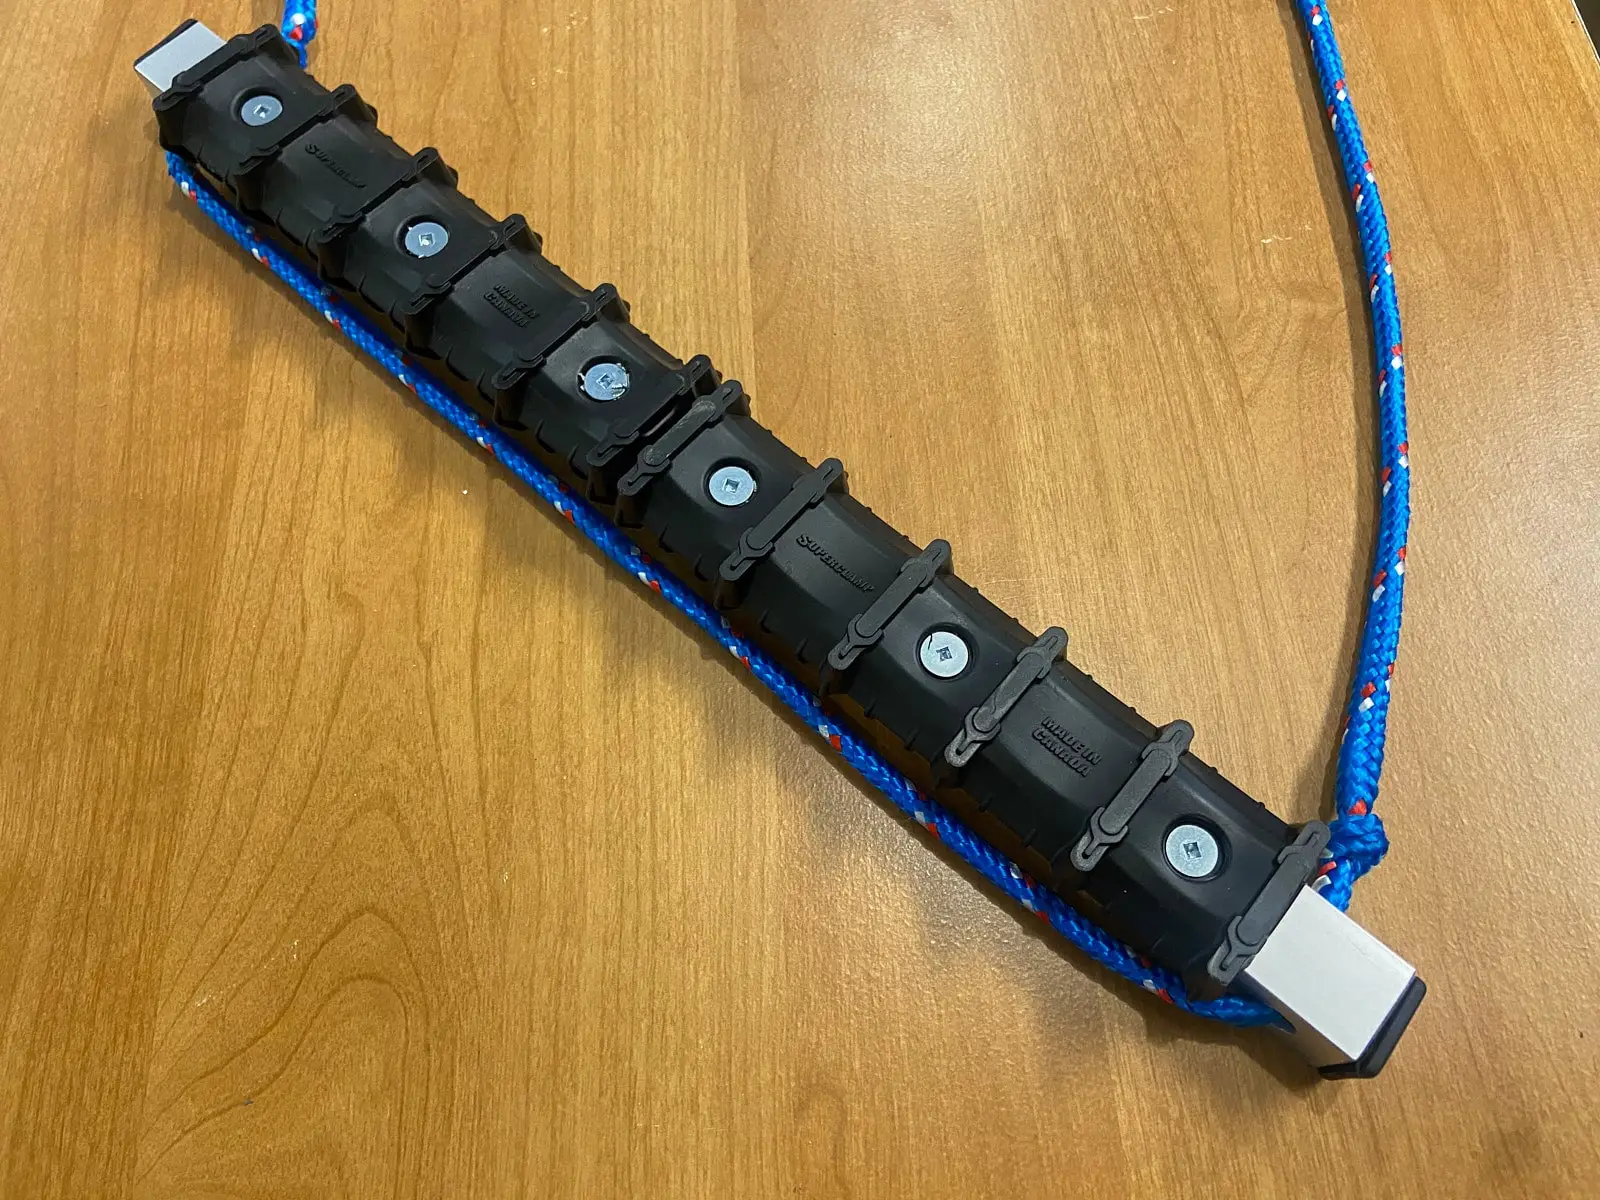
- Secure the tube in place by tying a simple knot in the rope at each end of the tube.
- Then, measure 12 in. from the first tube and tie another simple knot.
- Next, thread the next tube up to the knot you just made. If you measured correctly, you should have 12″ between the two tubes.
- As you did with the first tube, secure it in place with a simple knot at the end of the rope.
- Repeat steps 5 to 7 until all five (5) tubes are secured to the rope. Again, you should have 12 in. between each tube.
Step 5: Install the Hooks
Now that you’ve threaded and secured the five (5) tubes onto the rope, it’s time to install the hooks. These will be installed about 16 inches from the last tube. The hooks will be held in place by the cable ties.
- Take a first S-hook, then thread the rope through the hole.
- Using a cable tie, secure the hook 16 in. from the last tube.
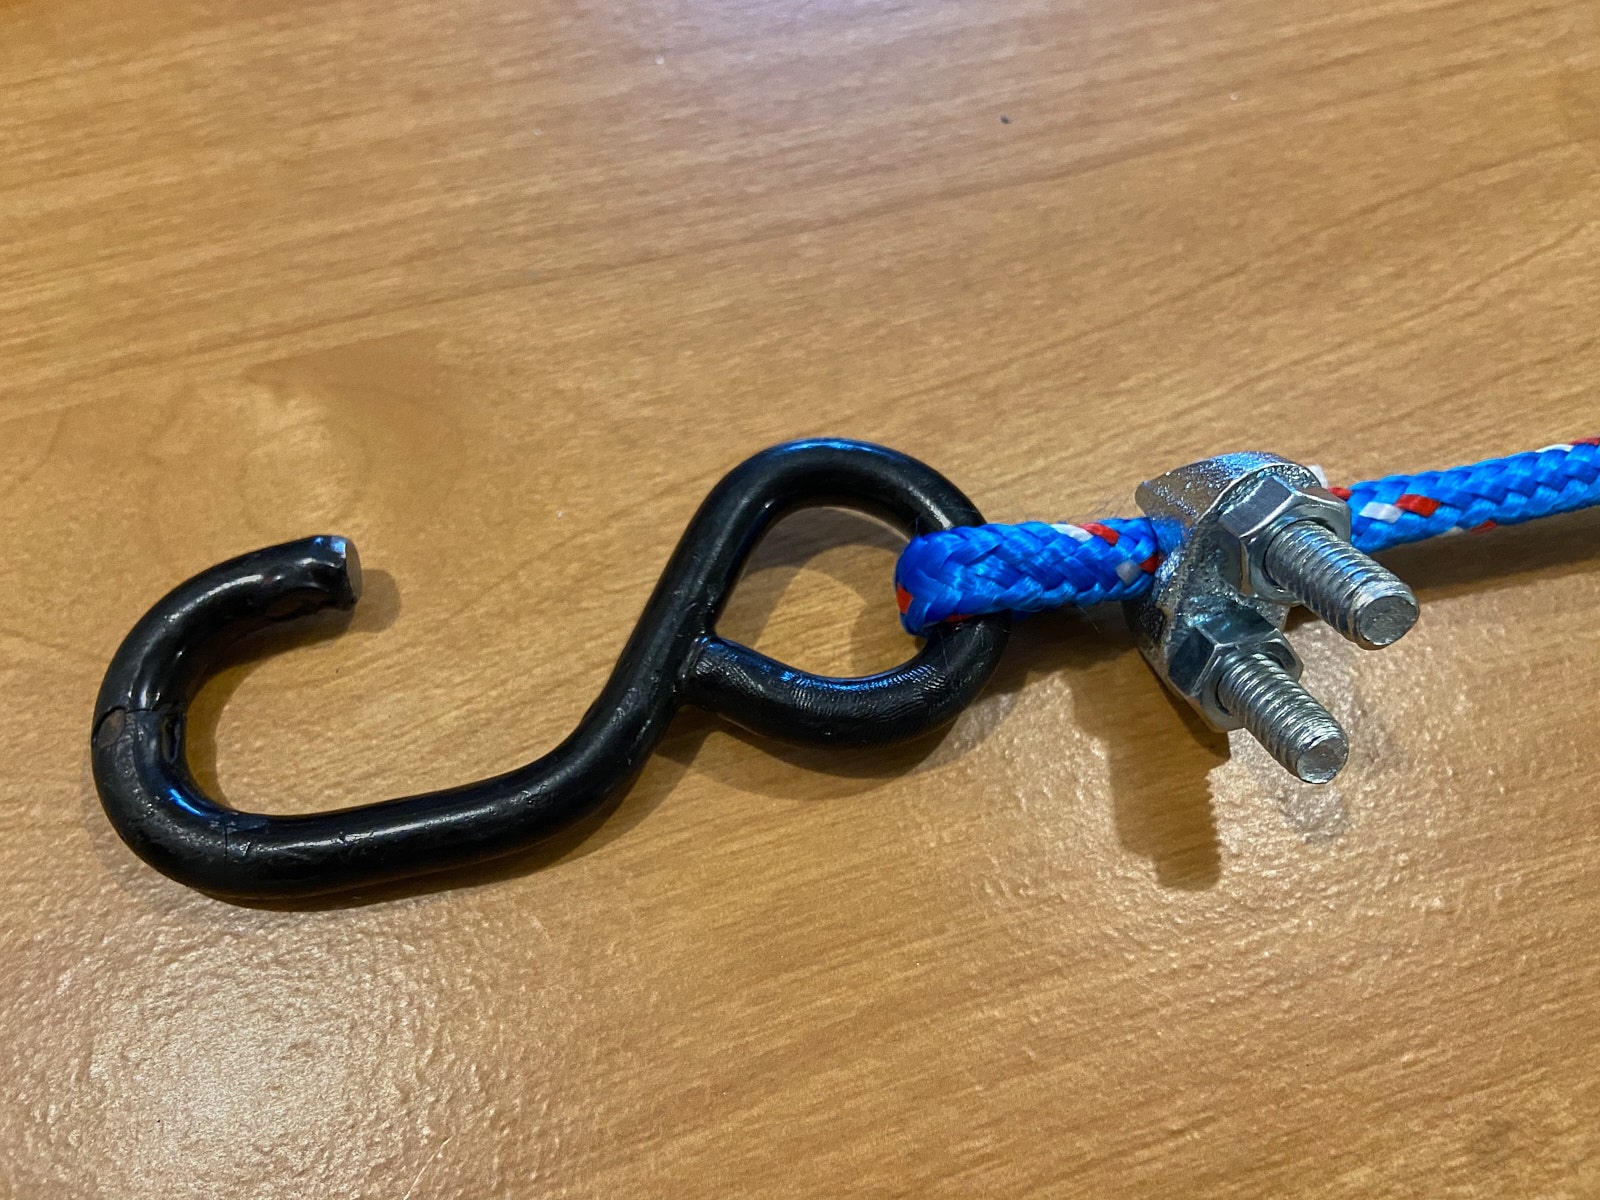
- Repeat the process with the second hook at the other end of the rope.
- Once the hooks are securely in place, cut any excess rope as needed.
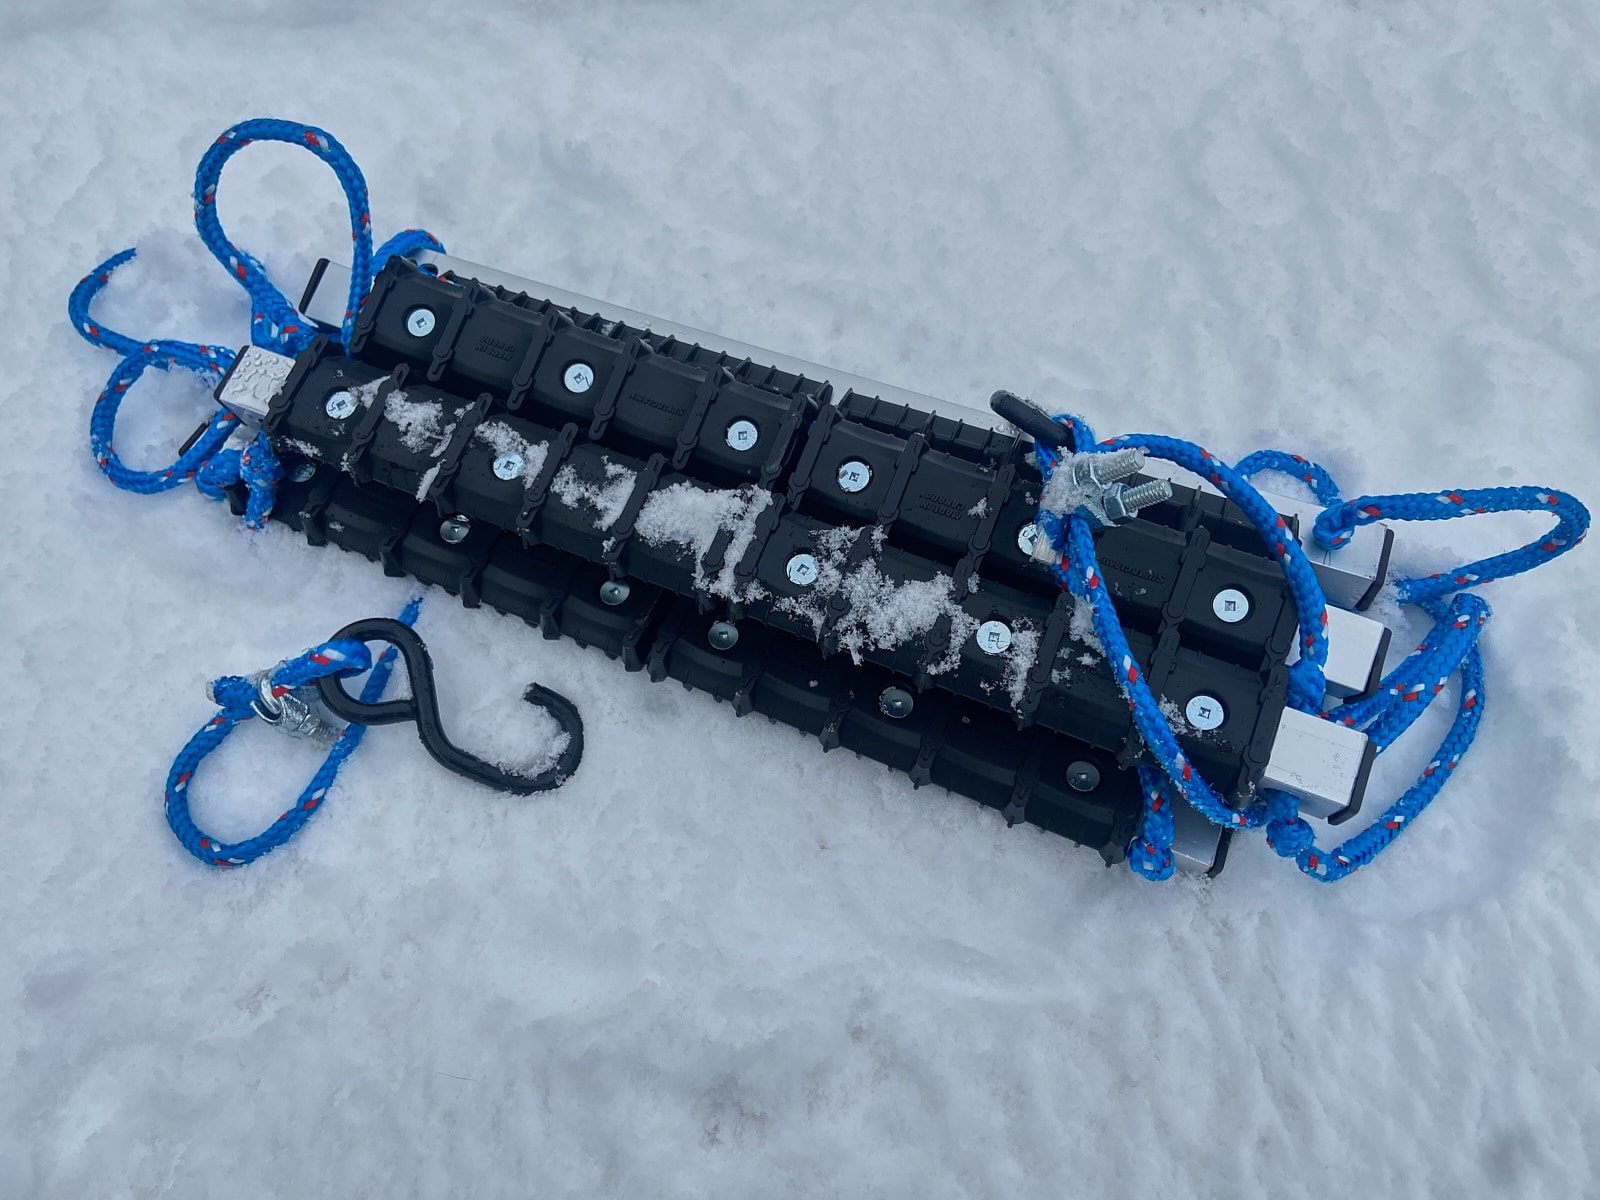
Step 6: Finishing Touches
Finally, it’s time for the finishing touches! Close the tubes using the square tube end caps. I recommend using a rubber mallet to avoid damaging the surface of the caps. That said, a regular hammer will work just fine.
A Job That Meets Your Expectations!
And there you have it! You’ve just built your own traction ladder. As you can see, this project is simple and quick. It doesn’t require specialized tools, and these steps can be done with minimal skills. Your level of experience will determine how long the project takes. You can expect it to take two to three hours to complete.
Storage and Transport: A Traction Ladder That’s Easy to Store
Given the lightweight materials used, your traction ladder should weigh less than 3 kg. Additionally, it requires very little space for storage. As a result, it can easily be stored in the cargo area of your truck without taking up much room.
Safety and Reliability: The Traction Ladder, an Essential Accessory
In conclusion, you won’t need your traction ladder all the time. However, you’ll have this essential accessory on hand if the ground is icy. Believe me, if the loading surface isn’t optimal, you’ll be glad to have it!
— — — — —
Continue Reading
Polaris 2026 Voyageur Adventure Ultimate 155 2026: A Sport-utility Snowmobile Full of Promise!
Discover Charlevoix: The Ideal Destination for a Snowmobiling Getaway
Ski-Doo 2026: A Year of Refinement and Innovations for All Terrains